
Alteryx is great for a lot of analysis, and the in-built tools improve with every release. But sometimes you just need to work with the R code directly; maybe you’ve inherited an R document that you need to reproduce, or maybe you need to use a specific package for sentiment analysis, or maybe you’re just far more used to R syntax and want to make sure the model is running exactly as you intend.
This is where the R tool comes in handy.
For this blog, I re-ran a section of one of the experiments I did for my PhD. You can find the data and R analysis script here (better still, download the Rmarkdown html and view in your browser to see the code and the command line output), and you can read the paper here. One section of the analysis compared mixed models using the lme4 package, which I’m not sure how to do in Alteryx. I’m sure there’s a way, but the R tool is perfect for making sure that I reproduce the results exactly.
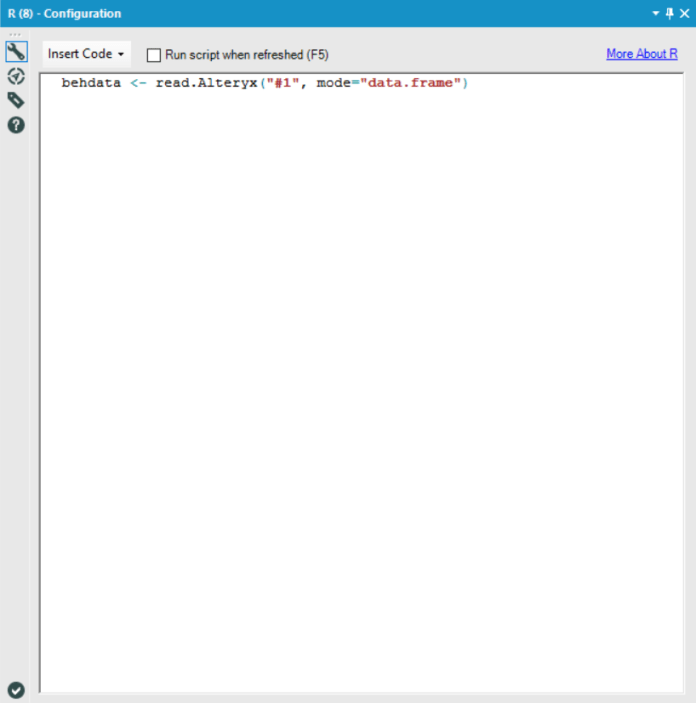
First, drop the R tool into the workflow:

It’s not enough to just connect the previous tool to the R tool input, though; you have to specifically tell the R tool to load the data in. You can do that with this bit of code at the top of the scripting panel. The R tool takes multiple inputs so you can bring in various different pieces of data; the R tool recognises them as #1, #2, #3, etc. This line says “read input #1 into the R tool as a dataframe and store it as behdata within the R script”:
You then need to load the R packages you’ll be using. It’s a bit tricky to install extra R packages in Alteryx if the installer doesn’t match your version, but Alteryx comes with quite a lot of useful R packages pre-installed anyway (see here for Alteryx 10 and here for Alteryx 11). However, even if the packages are already installed, they need to be loaded each time.

Now, you can continue with the R code… for the most part.

Once you’ve done your coding, you’ll need to write the results to the R tool output. This code is pretty similar to the input; it reads “write the object modelcomparison to R tool output 1”:

However, because Alteryx works with dataframes, you can only write dataframes to Alteryx. This means you’ll have to convert matrices into dataframes, and if you’re dealing with lists, you’ll have to coerce them to dataframes before you can do anything with them.
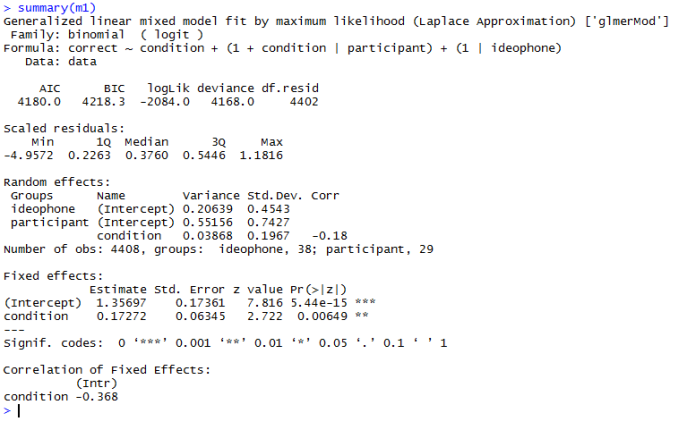
Sadly, the R tool doesn’t have a command line. When I want to look at the properties of the model, in R I’d simply type summary(modelname) and get a nice result in the command line:
One way of doing this in Alteryx would be to store the summary as an object and then write to one of the outputs. However, a model summary like this is a list in R, which can’t be written to Alteryx without converting it to a dataframe first. If you try it, you’ll see this error:

and it’s a little more complicated than that, but that’s another blog for another time.

Pingback: How to be an R soul: an introduction to the R tool in Alteryx – The Information Lab – Cloud Data Architect