Uncategorized

How to update a production file in Excel very carefully

First things first – keeping and updating important data in an Excel file is not a good idea. There’s a massive risk of human error, which is why there’s a whole industry of information management tools that do a much better job at it.

But sometimes it’s inevitable, and you’ll end up with a situation where a file called CrucialInformation.csv or something like that is feeding into all kinds of different systems, meaning that it’s now a production file that other things depend on. And maybe you’re the person who’s been given the responsibility of keeping it updated. The data person at your job has said “this file is really important, make sure you don’t accidentally put wrong information in or delete anything out of it because then everything will break, okay, have fun, bye!”, and left you to it.

So, how do you responsibly manage a production csv file without breaking things and while minimising mistakes?

In this example, let’s say we work for a shop that sells food items, and the government has introduced new restrictions around items with the ingredient madeupylose in them. Items with high levels of madeupylose can only be sold to over 18s from behind the counter with the cigarettes, items with medium levels of madeupylose can be sold to over 18s from the normal shelves, and items with low levels of madeupylose can be sold to anybody as normal. This isn’t one of the main ingredients that we track in the proper systems yet, so while the data team are working on getting this set up in the databases, we need to manually track which items have madeupylose in them as a short-term solution.

(just to be explicit, this is a completely made-up ingredient in a completely made-up example! but I do use this approach for making targeted updates to large files)

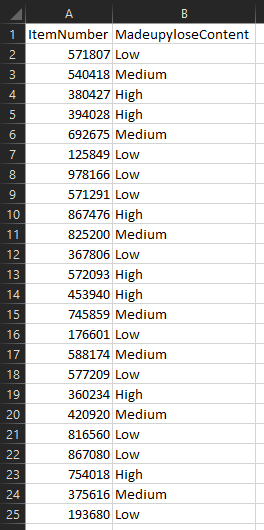
We’ve got a production file called MadeupyloseItems.csv which stores the data, and it looks like this:

Let’s go through how to make controlled updates to this file and not break everything.

Step 1: don’t even touch it, just make copies

First of all, the safest thing to do is to pretty much never touch the production file. Firstly, because having a file open will lock it, so any background process that’s trying to access the data inside it won’t be able to. Secondly, because creating copies means we can have an archive and muck about with things safe in the knowledge that we won’t mess it up.

Wherever the production file is saved, I generally create a folder called “_archive”:

I do all the actual work on files saved in here, and almost never touch the file itself. Let’s have a look at what’s already in there:

There are two archived, datestamped files in there already – the csv from 12th September 2022, and a copy of the live production file with the datestamp from when it was last saved. It’s important to keep them there just in case I make a mistake and need to restore an old version.

There’s also the Madeupylose updater file, which I use to make my updates.

Step 2: create a totally separate Excel file to manage changes

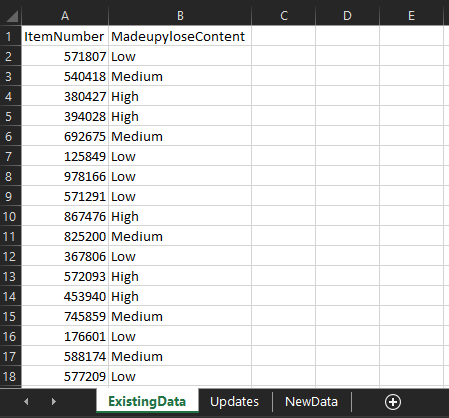
I use a dedicated Excel file to manage the changes I make to production csv files. In the first tab, I copy/paste all the data from the most recent file – in this case, I’ve copy/pasted it out of the 220914 Madeupylose.csv file in the _archive folder so I don’t have to open the live file:

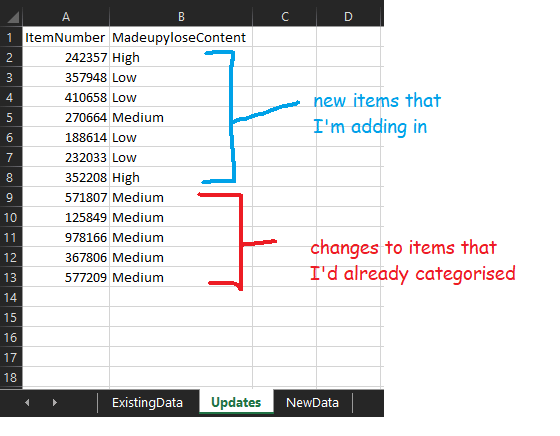
In the next tab, I make my actual changes. I’ve got some items that I’m adding in and some items that I’m recategorising:

I can use this file to add in some checks – for example, have I spelled “High”, “Medium”, and “Low” correctly? Are they all the same format? There are loads of things you could do here, like sticking a filter on to check individual values, making sure that there are no duplicates, and so on.

Once I’m happy with my updates, I now need to add them to the production file somehow. I could potentially just open the file and add them in… but that would involve opening the file, for a start, and maybe disrupting another process. And it’s not just a case of adding them in – I could simply copy/paste the new items, but I’d have to find the already-categorised items and have to change them, which would be quite easy to make a mistake on (and I really don’t want to hit CTRL+F a load of times).

So, this is where I create a third tab called New Data and use a couple of xlookups.

Step 3: xlookups

If you haven’t come across xlookups before, they’re just like vlookups but simpler and better.

Firstly, I’m going to create a new column in the ExistingData tab, and I’ll use this formula:

=XLOOKUP(ExistingData!A2, Updates!A:A, Updates!A:A)

What this does is take the item number in the existing data tab, look for it in the updates tab, and if it finds it in the updates tab, it’ll return that number. If it doesn’t find it, it gives me an #N/A value:

What this means is that I can distinguish between the items that have already been categorised that I’ve changed and the ones that I haven’t. I know that anything with an #N/A value in the lookup column is an item that I haven’t changed at all. So, I can add a filter to the lookup column, and select only the #N/A values:

I’ll copy/paste columns A and B for these items into the NewData tab. Then, I’ll copy/paste columns A and B for all items in the Updates tab into the NewData tab underneath (and remember to remove the headers!). Now, I’ve got the full information in one place:

What I like about this approach is that it works the same whether you’re updating 20 records or 20,000 records – once you’ve made your updates in the updates tab, the xlookups to get it all transferred over only take seconds, and you can be sure that you’ve definitely got all the things you need in the NewData tab.

Step 4: update the production file

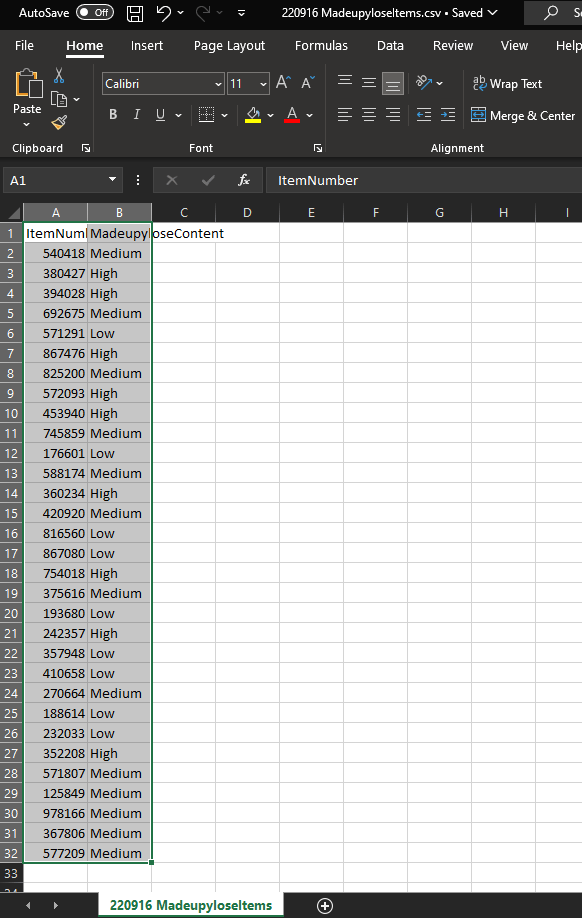
We’re now ready to update the production file. I prefer to take an extra step to create a whole new csv and never actually touch the production file. So, I’m going to take everything in the NewData tab, copy/paste it into a new file, and save that as a csv called “220916 MadeupyloseItems.csv” in the _archive folder:

We’ve got the archived version of the current file – it’s the one from 220914, so there’s a backup in case I’ve messed up the latest update somehow. We’ve also got the archived version of the new file that I want to be the production file. The final step is to move that into production by overwriting the production file. That’s as simple as going back to the 220916 MadeupyloseItems.csv file in Excel, hit Save As, and overwrite the live file:

And there we have it! We’ve updated the live production file without even touching it, we’ve carefully tracked which lines we’re adding in and which lines we’re changing, and we’ve got a full set of backups just in case.

Standard
Uncategorized

How to open an open Excel file in Alteryx

Before I start this blog, a disclaimer:

This is disgusting. Don’t do it. If you are running a production workflow off a manually maintained Excel file, you have bigger problems than not being able to open an Excel file in Alteryx because somebody else is using it.

With that out of the way… you know how you can’t open an Excel file in Alteryx if you’ve got that file open? Or worse, if it’s an xlsx on a shared drive, and you don’t even have it open, but somebody else does? Yeah, not fun.

The “solution” is to email everybody to ask them to close the file, or to create a copy and read that in, changing all your inputs to reference the copy, then probably forgetting to delete the copy and now you’re running it off the copy and nobody’s updating that so you’re stuck in a cycle of overwriting the copy whenever you remember, and … this is not really a solution.

The ideal thing to do would be to change your process so that whatever’s in the xlsx is in a database. That’d be nice. But if that’s not an option for you, I’ve created a set of macros that will read an open xlsx in Alteryx.

In the first part of this blog, I’ll show you how to use the macros. In the second, I’ll explain how it works. If you’re not interested in the details, the only thing you need to know is this:

  1. They use run command tools (which means your organisation might be a bit weird about you downloading them, but just show them this blog, nobody who uses comic sans could be an evil man).
  2. Those run commands mimic the process of you going to the file explorer, clicking on a file, hitting copy, hitting paste in the same location, reading the data out of that copy, then deleting that copy. Leave no trace, it’s not just for hiking.
  3. This means that command windows will briefly open up while you’re running the workflow. That’s fine, just don’t click anything or hit any keys while that’s happening or you might accidentally interrupt something (I’ve mashed the keys a bit trying to do this deliberately and the worst I’ve done is stop it copying the file or stop it deleting the file, but that’s still annoying. Anyway, you’ve been warned.).

The macros

There are three macros, which you can find here:

1a: Open an open xlsx – sheet names from full path
https://gallery.alteryx.com/#!app/Open-an-open-xlsx—sheet-names-from-full-path/60267d29826fd3151084eb8c

1b: Open an open xlsx – sheet names from browse
https://gallery.alteryx.com/#!app/Open-an-open-xlsx—sheet-names-from-browse/60267d330462d71a2ce6075d

2: Open an open xlsx – read specific sheet
https://gallery.alteryx.com/#!app/Open-an-open-xlsx—read-specific-sheet/60267d388a933713608a284d

Using these macros is a two-step process. The first step takes the xlsx and reads in the sheet names. There are two options here; you can browse for the xlsx file directly in the macro using option 1b, or you can use a directory tool and feed in the necessary xlsx file using option 1a (this is a few extra steps, but it’s my preferred approach). You can then filter to the sheet(s) you want to open, and feed that into the second step, which takes the sheet(s) and reads in the data.

Example 1

Let’s work through this simple example. I’ve got a file, imaginatively called 201210.test.xlsx, and I can’t read it because somebody else has it open. In these three steps, I can get the file, select the sheet I need, and get the data out of it:

In the first step, I’m using macro 1b: Open an open xlsx – sheet names from browse. The input is incredibly simple – just hit the folder icon and browse for the xlsx you need:

But this one comes with one caveat – for the same reason that you can’t open an xlsx if it’s open, the file browse doesn’t work if the xlsx is open either. You only need to set this macro up once, though – once you’ve selected the file you need, you’re good, and you can run this workflow whenever. You only need to have the file closed when you first bring this macro onto the canvas and select the file through the file browser.

This returns the sheet names:

All you need to do next is filter to the sheet name you need. I want to open Sheet2, so I filter to that and feed it into the next macro, which is macro 2: Open an open xlsx – read specific sheet. This takes three input fields – the full path of the xlsx, the sheet you want to open, and the line you want to import from:

[FullPath] and [Sheet Names] are the names of the fields returned by the first macro, so you shouldn’t even need to change anything here, just whack it in.

That gives you the data in Sheet2!

Example 2

Let’s do the same thing with a directory tool and my preferred approach – using macro 1a: Open an open xlsx – sheet names from full path:

In the first step, I use the directory tool to give me the full paths of all the xlsx files in a particular folder. This is really powerful, because it means I can choose a file in a dynamic fashion – for example, if the manually maintained process has a different xlsx for each month, you can sort by CreationTime from most recent to least recent, then use the select records tool to select the first record. That’ll always feed in the most recently created xlsx into the first macro. In this simple example, I’m just going to filter to the file I want, then deselect the columns I don’t need, which is everything except FullPath:

I can now feed the full path into the macro, like so:

…and the next steps are identical to example 1.

Example 3

If you need to read in multiple sheets, the get open xlsx sheet data macro will do that and union them together, as long as they’re all in the same format. I’ve got another example xlsx, which is unsurprisingly called 201210 test 2.xlsx. I’ve got four sheets, one for each quarter, where the data structure is identical:

The data structure has to be identical, can’t stress that enough

With this, you don’t have to filter to a specific sheet – you can just bung the get open xlsx sheet data macro straight on the output of the first one, like this:

That’s all you have to do! If this is something you’ve been looking for, please download them from the public gallery, test them out, and let me know if there are any bugs. But seriously, please don’t use this as a production process.

How it works

It’s all about the run commands. I’ll walk through macro 1a: open an open xlsx from a full path, but they’re all basically the same. There are four main steps internally:

  1. Creating the file path and the batch commands
  2. Copying the file
  3. Getting data out of the copy
  4. Deleting the copy

The first regex tool just finds the file extension. I’ll use this later to build the new file path:

The formula tool has three calculations in it; one to create a new full path, one to create the copy command, and one to create the delete command.

The NewFullPath calculation takes my existing full path (i.e. the xlsx that’s open) and adds a timestamp and flag to it. It does this by replacing “.xlsx” with “2021-02-12 17.23.31temptodelete1a.xlsx”. It’s ugly, but it’s a useful way of making pretty sure that you create a unique copy so that you’re not going to just call it “- copy.xlsx” and then delete somebody else’s copy.

The Command calculation uses the xcopy command (many thanks to Ian Baldwin, your friendly neighbourhood run-command-in-Alteryx hero, for helping me figure out why I couldn’t get this working). What this does is create a command to feed into the run command tool that says “take this full path and create a copy of it called [NewFullPath]”.

The DeleteCommand calculation uses the delete command. You feed that into the run command tool, and it simply takes the new full path and tells Windows to delete it.

Now that you’ve got the commands, it’s run command time (and block until done, just to make sure it’s happening in the right order).

To copy the file: put a select tool down to deselect everything except the command field. Now set up your run command tool like this:

You want to treat the command like a .bat file. You can do this by setting the write source output to be a .bat file that runs in temp – I just called it CopyFiles.bat. To do this, you’ll need to hit output, then type it in in the configuration window that pops up, and keep the other settings as above too. If you’re just curious how this macro works, you don’t need to change anything here, it’ll run just fine (let me know if it doesn’t).

To get the list of sheet names, the first step is to create a new column with the full path, a pipe separator, then “<List of Sheet Names>” to feed into the dynamic input:

From there, you can use the existing xlsx as the data source template, and use NewFullPathSheetNames from the previous formula as the data source list field, and change the entire file path:

That’ll return the sheet names only:

So the last step is an append tool to bring back the original FullPath. That’s all you need as the output of this step to go into the sheet read macro (and the only real difference in that macro is that the formula tool and dynamic input tool is set up to read the data out of the sheets rather than get a list of sheet names).

Finally, to delete the copy, deselect everything except the DeleteCommand field, and set it up in the same way as the copy run command tool earlier:

And that’s about it. I hope this explanation is full enough for you to muck about with run command tools with a little confidence. I really like xcopy functions as a way of mass-shifting things around, it’s a powerful way of doing things. But like actual power tools, it can be dangerous – be careful when deleting things, because, well, that can go extremely badly for you.

And finally, none of this is good. This is like the data equivalent of me having a leaky roof, putting a bucket on the floor, and then coming up with an automatic way of switching out the full bucket for an empty one before it overflows. What I should actually do is fix the roof. If you’re using these macros, I highly recommend changing your underlying data management practices/processes instead!

Standard