Twice a year, clock changes in the UK cause mild chaos. The extent of this chaos depends on your computer settings, your remote desktop/server settings, and how exactly you’ve set stuff up to figure out what the time is.
We normally describe it by saying that the clocks go forward at the end of March, and the clocks go back at the end of October. I don’t find this particularly intuitive; it doesn’t actually address what we’re doing or why, it just describes what you need to do with your watch.
I think it’s easier to think of it not as the clocks changing, but as the whole country shifting time zones, because that’s what we’re actually doing.
What’s the time?
Firstly, though… what’s the time?
As I write this, sitting in the office in Leeds, the UK, it’s about 11am on 21st May 2025. Thing is, yes, that’s the time, but it’s just my local definition of the time. To help with understanding time zones, we need to know The Time.
This is UTC, or Coordinated Universal Time. UTC isn’t just the time. UTC is The Time, and it’s the same wherever you are. Try googling it:
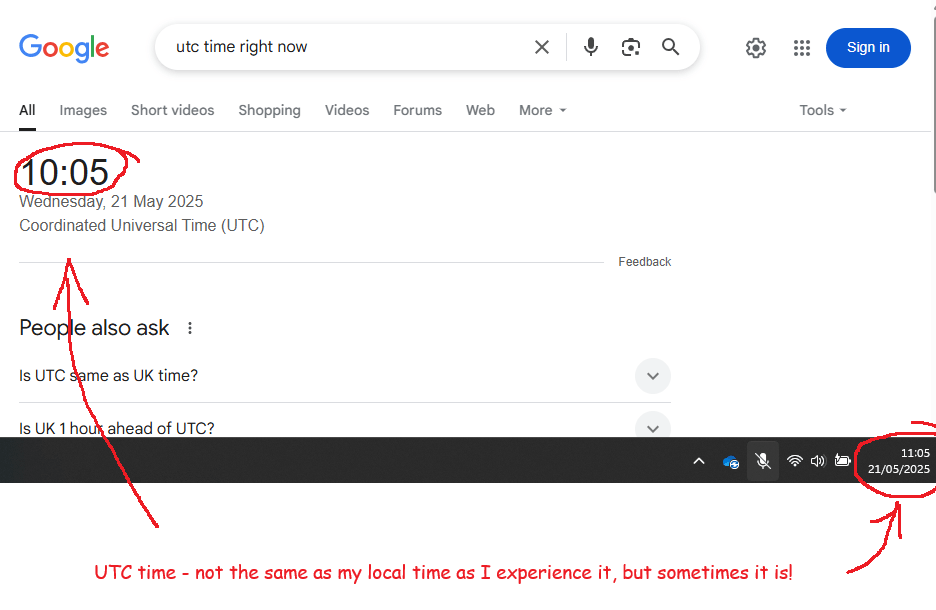
We could simply sack off the concept of time zones and run everything off UTC. The world of data would be a lot easier if we did and it’d save me a load of hassle at work.
But, this is a rubbish idea. Culturally, we’re used to the time being something meaningful about when it’s light and when it’s dark. The whole point of “AM” is that it means “before the middle of the day where the sun as at its highest point” and “PM” means “after that”.
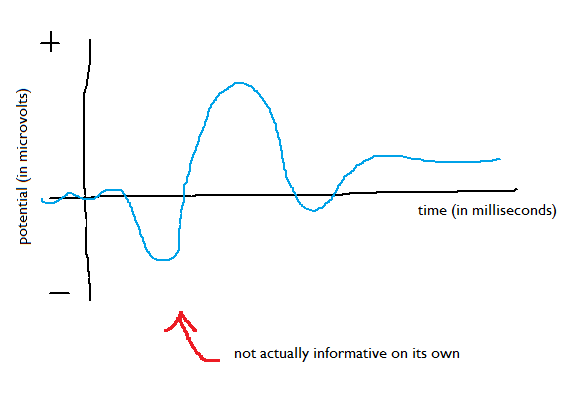
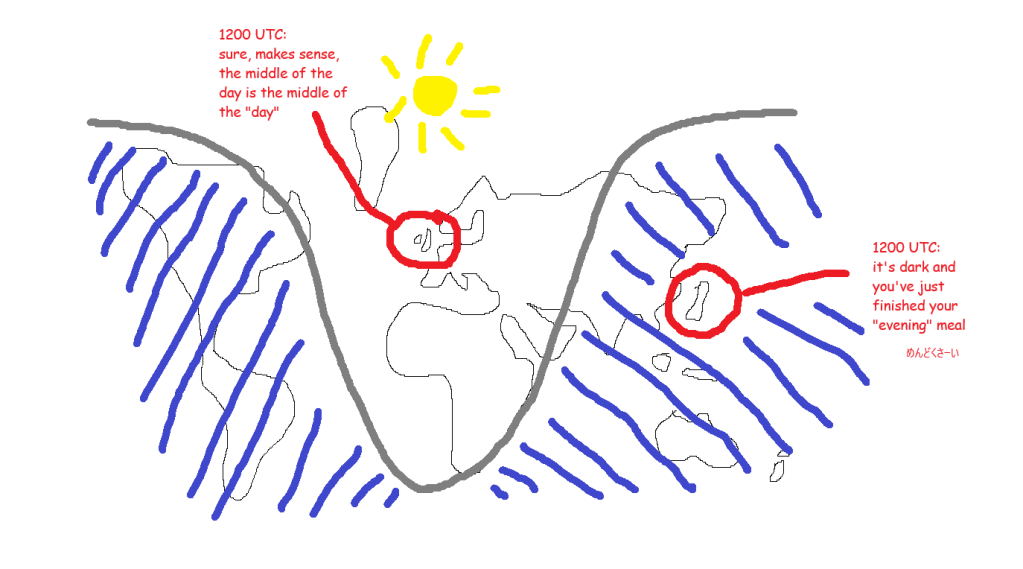
If we ran everything off UTC, then “midday” in the UK would be grand, but “midday” in Japan would be a few hours after the sun has set. Also, “midnight”, when the date changes, would be around when people are starting work or school. You’d get on the school bus on Tuesday at 2315, get to school, and start Maths at “midnight” on Wednesday. Not a great way to run things. This very much not-to-scale diagram shows what that’s like during the northern hemisphere summer:
What are time zones?
So, each country (or each region of big wide countries) chooses what they want the time to be in that country, based on what makes sense for daylight in that country. Luckily, everybody around the world is pretty much in agreement that you generally want “midday” i.e. 1200 to be around the time that the sun is at its highest point and you want the date to change from Tuesday to Wednesday overnight.
You do this by setting the time where you are relative to The Time, i.e. relative to UTC.
It’s easier to explain time zones using places far away from the UK because it’s more obvious why you’d do it. If Japan used UTC time for everything, then, as I’m writing right now, 11am UTC time on 21st May 2025, the time in Japan would be 11am on 21st May 2025 but everything would be dark because the sun has already gone down.
In Japan’s case, they’ve looked at the clocks and the daylight and thought “we want the time here to be 9 hours ahead of the UTC time, so the time in Japan is UTC+9, which means that when it’s midday UTC, it’s 9pm here, which makes much more sense than just using UTC time like in Gwilym’s diagram above”. This time zone is called Japan Standard Time, or JST.
South Korea have done the same thing (Korea Standard Time, KST), as have North Korea (Pyongyang Time, PYT), Palau (Palau Time, PWT), Timor-Leste (Timor-Leste Time, TLT), most of the Sakha Republic in Russia (Yakutsk Time, YAKT), and some of Indonesia (Eastern Indonesia Time, WIT). These are all individual time zones defined by being UTC+9, and you can kind of think of them as all living in one super time zone UTC+9. At least, I do.
In the UK, UTC already aligns almost exactly with what we want. Midday UTC is pretty much at the sun’s highest point. Midnight is pretty much at the midpoint between when the sun goes down and when it comes back up again. So, we could just use UTC as the time by creating a time zone where the time is UTC+0.
However, there is no single UK time zone. We switch between UTC+0, which we call Greenwich Mean Time or GMT, and UTC+1, which we call British Summer Time, or BST. Because of this, sometimes people think that UTC and GMT are the same thing. They’re not; they give you the same end result, but GMT is a time zone based on UTC+0.
What happens when the clocks change?
In the UK, we change the clocks at the end of March, when the clocks go forward, and end of October, when the clocks go back.
We talk about the clocks “going forward” because of the act of how you adjust a clock. At 1am on a Saturday night/Sunday morning in late March, we skip an hour, and move straight from it being 1am to it being 2am. Then in October, we reverse it; the clocks go back because we get to 2am, and then move the clock back to being 1am again, essentially repeating an hour.
I find that it’s a lot easier to think of it as moving time zone rather than just changing the clocks. In the winter (late October through late March), we’re on GMT, i.e. UTC+0. This means that the time in the UK is the same time as The Time, UTC.
Then, in late March, we switch time zones to BST, i.e. suddenly the time in the UK is UTC+1 instead of UTC+0. It’s the same experience as going to France and changing your watch; you’ve changed time zone, but without physically travelling.
In late October, we switch back to GMT, i.e. UTC+0. It’s the same experience as coming back from France and changing your watch back.
The implications for daylight in the UK is that the we’re shifting the when sunrise and sunset happen. Well, sort of – sunrise and sunset still happen at the same time, based on UTC, it’s more that we’re shifting when our experience of it happens.
In late March, switching to UTC+1 means that the sun rises an hour later and also sets an hour later. So, we get more light in the evenings for longer, but less light first thing in the morning. It also means that the sun’s highest point is at about 1pm rather than literally midday.
In late October, switching back to UTC+0 means that the sun rises an hour earlier and also sets an hour later. So, we get more light earlier in the mornings, but it gets darker earlier in the evenings. It also means that the sun’s highest point is at about 12 noon.
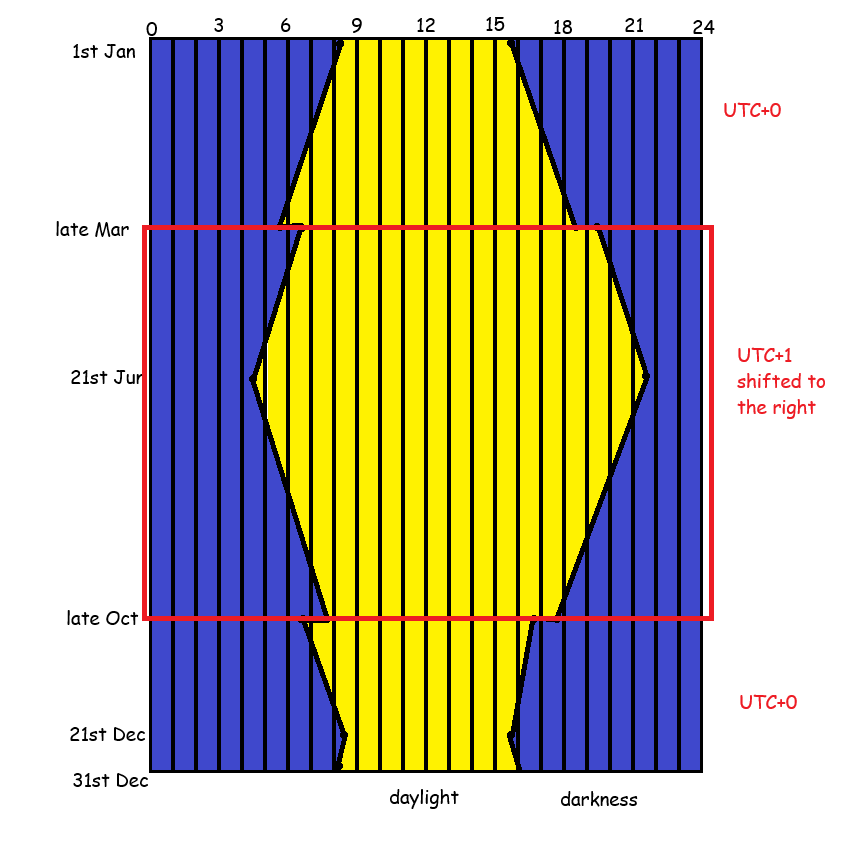
It’s probably easiest to show this using some actual clock times throughout the year. Where I live, in Leeds, what this means is (using 2025 dates):
- Mar 29th, the last day in GMT: sunrise is 0546, sunset is 1836
- Mar 30th, the first day in BST: sunrise is 0643, sunset is 1938
- I notice this on my cycling club rides on Wednesday evenings, which start at 6.30pm. Suddenly we go from meeting up in the twilight and having bike lights on constantly to having a bit more light and being able to see the sun set in the Dales.
- June 21st, longest day: sunrise is 0435, sunset is 2141
- Oct 25th, last day in BST: sunrise is 0753, sunset is 1746
- Oct 26th, first day in GMT: sunrise is 0654, sunset is 1644
- I notice this shift at work. I’ve gone from arriving at the office in the dark to arriving in the office in the light again, at least for another couple of weeks.
- Dec 21st, shortest day: sunrise is 0822, sunset is 1546
If we stuck with GMT the whole year round, then on June 21st, we’d have sunrise at 0335 and sunset at 2041. Personally, I’d find this pretty annoying because I love the UK’s long summer evenings. It’s really nice to sit in a beer garden in daylight at 9.30pm, or to go for a long bike ride after work without needing bike lights, whereas I get up at about 6am so the difference between a 0335 sunrise and a 0435 sunrise makes no difference to me.
If we stuck with BST the whole year round, then on Dec 21st, we’d have sunrise at 0922 and sunset at 1646. These late, late mornings can be pretty depressing, and some arguments go that it’s important for traffic safety to have more daylight in the morning. I’m less convinced; in December, based on a 8.30am to 5pm working day, you’ll either be driving to work in the dark or driving home in the dark anyway. Personally, I’d stick to BST the whole year round and simply rebrand it “British Standard Time” instead of British Summer Time, which funnily enough is exactly what we did from 1968 to 1971. This UK parliamentary document is a nice long read about it.
What does this mean for data?
Right, 1600 words in, time to finally get to the point. For anybody working in data, it’s really important to know what time your processes run, and what definition of time you’re using for it.
People (i.e. your non-data colleagues) will expect things to happen at the same time based on their experience of time. Let’s say you automate a data model refresh at 8.30am and automate an email subscription to this report called “the daily 9am report” which gets sent out at 9am. The people receiving this report will expect it to be available at 9am *as they experience 9am*, regardless of whether we’re on UTC+0 or UTC+1.
The problem is, a lot of default data settings are set to UTC time. For example, maybe your Power BI / Tableau / SQL server is fixed to UTC time (or maybe it’s defaulted to the time in California if it’s some kind of service you’re buying from a tech company). That means:
- If you first set up the daily 9am report subscription for 9am during late March to late October when we’re on UTC+1, then it’s happening at 8am UTC time. So, in late October when we switch to UTC+0, that subscription will still get sent out at 8am UTC time, but to your report recipients, it’ll happen at 8am as we experience it. This also means that, if the reason you’ve scheduled the data refresh for 8.30am and the report subscription for 9am in the first place is that the source data is only available at 8am (regardless of what time zone we’re in), then the report will get sent out at 8am with no data in it. Or in other words, the report will be an hour early, but it’ll be useless because it’s got nothing in it.
- If you first set up the daily 9am report subscription for 9am during late October to late March when we’re on UTC+0, then it’s happening at 9am UTC time. So, in late March when we switch to UTC+1, the daily 9am report subscription will land in people’s inboxes at 10am as we experience it, i.e. it’s getting sent out an hour later than expected, which people won’t be happy about.
Luckily, a lot of services let you specify time zones in your refresh schedules or processes, and adapt to local time settings. Or you can set your server time to reflect local time settings rather than UTC, which means that the server running the jobs will automatically keep the right definition of what 9am means.
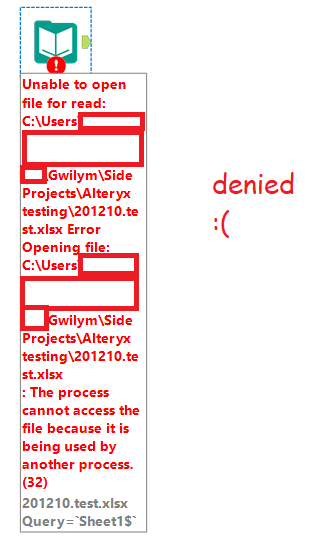
But, whenever you’re doing anything that involves automating something at a particular time, watch out for UTC. If something’s being done based on UTC, then it’ll cause problems next March or October. Especially if, for example, you’ve automated something or set a date field definition based on getdate()/now() just after midnight, or taken a date and converted it to a datetime which will set that datetime to midnight, and then suddenly after the clocks change, that’s now 11pm on the day before!
You also want to make sure you understand the difference between your local time and your server time. For example, my laptop auto-updates between GMT and BST, so I never have to worry about it. But some of the servers we use run on UTC only. So, there’s sometimes a mismatch between my local laptop time and my server time, meaning that when I automate something, it might not do what I think it’s doing. Just because a query with getdate() or now() works fine on my laptop, that doesn’t mean it’ll return the same result when I schedule it on a server.
Finally, this has just focused on the UK and when we change our clocks – some countries also do this, other countries don’t, and of the other counties that also do this, they might not do it at the same time! So if you’re working internationally, it’s all compounded.


")
 (lighter)")